Thursday, December 19, 2013

Yes, Another Sleigh Bell Harness

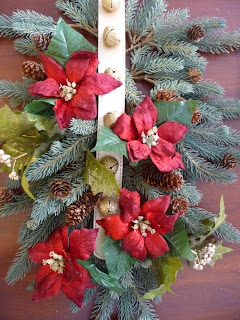
Today's craft includes a second sparkly gold sleigh bell harness I purchased at JoAnn's, a few findings from my stash, and more of my mother-in-law's decorating items.  (JoAnn Fabric & Crafts is one of my favorite places to shop.)

I put together this particular flower arrangement several years back with the intent that it would be attached to the front cover of a scrapbook I wanted to put together for my in-laws. I had hoped that the album would become sort of a coffee table book to be enjoyed by all. Well it turns out I'm horrible scrapbooker, especially when it comes to paper scrapping. It also took several more years to get the information needed to tell the story of each picture. Maybe one of these days I will finally get around to telling their story in digital form.  So this floral arrangement was really without a true purpose.  So sad.

So the first thing I'd did was take it apart.
There's a lot of good stuff there but not all of it is right for this particular craft.

First, I needed to make up a base. A few years back I got a heck of a deal on some Christmas tree garland. I think these were sold in 9 or 10 foot lengths. Each length of Garland can make three bases for these sleigh bell arrangements. Using wire cutters I cut each Garland into three somewhat equal lengths. This is crafting so we don't have to be precise.  Only one section is needed per arrangement.  The rest will be used for more sleigh bell arrangements.
With the (approximately) 3 foot section of garland, I formed a loop and connected the ends to each other. I stretched it out flat as shown in the photograph of the base. Since the harness will go down the center of the arrangement, all of the little evergreen branches should be bent to go towards the outside. However a few need to be bent towards the inside forming a ladder effect as shown in the base picture.  This maintains the shape of the base and gives the sleigh bell harness something to rest on.

Here's the rest of the materials I used for this arrangement. Notice in the picture that I've already placed the sleigh bell as well as a few gold sparkly twigs with berries that were in my stash of goodies. I'm certain those came from my mother-in-law as well.

The gold pick containing a nice assortment of sparkly stars, gold lame leaves, gold painted sticks and  festive balls was probably in the bottom of a clearance bin at JoAnn's after Christmas one year. Yes I am a faithful clearance bin shopper. Unfortunately I only had one of these picks so I took it apart.
I knew it would look good at the top of the sleigh bell harness. Matching pairs of wired items, I went about re-creating this pack to better suit my needs.
When all that remained were unmatched single items, I simply worked them in to where they look nice.
The wire stems make this super easy to twist together for this project.
Using floral wire, I attached my new gold sparkly "double-pick" as well as the harness to the top of my base. This is the only place I attached the harness to my base. I utilize the loop of the harness where the ring is attached mostly because I only have green florist wire and it would look really tacky if it showed.
The next step is placing the various items on the arrangement. I started with the bigger items. These pine cones were easy to secure because they came with their own wire already.  I like pre-wired items.
The cream flowers went on next. That soft cream color looks lovely next to the gold of the harness and the brown of the pine cones.
This soft cream color was working so well I decided to slip in those smaller flowers which were saved from the original arrangement.  The stems of these flowers have no wire in them at all making them difficult to arrange in just the right spot. Without wire, the flowers tended to bunch together thus creating a larger visual effect than desired. 

Wrapping wire around the individual stems allows for more flexibility in the arrangement.

I did this with the leaves that came off of the original arrangement as well. The gold tone of these leaves is a pleasing subtle accent in this arrangement. (To achieve this look on leaves take gold metallic spray paint, spray it directly to a paper towel, and work it into just the bristle tips of a dry brush. Give the leaves a couple of soft and quick swipes with the brush.)

Here's a close-up of a single group of the small flowers attached  using florist wire. Of course after this picture is taken I went back and added wire to each of those stems so I could spread the flowers out.


Here's the finished arrangement on the wall. I utilized the loops of ribbon from the original arrangement as well, even fashioning a bowl out of three of them to give this arrangement a final bit of dressy flair. One of the nice things about this style of arrangement is that it can be attached to existing wall art. In this case the arrangement is attached to all wrought iron cross that was purchased from Hobby Lobby and permanently adorns in my great room.  I'm a huge fan of not having to undo a room just to decorate it for Christmas.

The unused dusty pink rose as well as the three sparkly gold tone pairs wait their turn in the bin of wonderful treasures.  Back on the shelf it goes until the next wave of inspiration hits.

There are more sleigh bells to come so watch for yet another sleigh bell post.

Wednesday, December 18, 2013

Recycled Christmas Decorations- Sleigh Bells


I am all for recycling and reusing. Two years ago, my stash of craft crap swelled to include many holiday decorations  which once belonged to my in-laws.  After my father-in-law's passing, my husband and two of his siblings had the daunting task of cleaning out a condo. The spouses helped and thankfully the job was completed in only a couple of weeks. That is how I came to own a bunch of bows, silk flowers, various evergreens, Christmas lights, and plenty of craft crap to keep my creativity buzzing for a long time.
Some days it seems as though my mother-in-law is visiting. She like to decorate and she loved bows and flowers. So when I find myself with the sudden urge to create a floral arrangement, I know my mother-in-law is visiting for the day.

For this arrangement, in addition to the gold sleigh bells that I purchased this year,  I gathered up three pieces of plastic spruce or whatever it is. It looks quite real but I can't remember what she used to use it for. I also grabbed some of her poinsettias and holly leaves as well as a giant ribbon bow. I remember making this bow for her for the top of small tree that was set up in her bedroom just before she passed away. We all knew she wouldn't make it to Christmas that year so without letting her know, we moved Christmas up about three weeks. Oh how she loved Christmas and what a treat it was to give her one final Christmas.

I started this project by arranging the three evergreen pieces like this. This will form the base of this arrangement.
I secured them together with floral wire.
Then I laid the sleigh bell harness on top .
I attached the belt from the sleigh bell harness to the stems of the evergreens with floral wire. The picture below shows the back side of the arrangement.
Next, I start to place the holly leaves...
and the flowers...
I use more floral wire to secure their stems to the arrangement.


There's no set way to arrange the various flowers and leaves, just move them around until they look good.
Once the flowers and greens are  secured into place it's time for the ribbon.
This particular ribbon had its own gold wire already to go. I just had to twist it into place.
Now there are times when I get to the end of a project and I notice that it's not quite right.


As perfectly matched as that cream and gold bow may be to the sleigh bell harness, It is simply way too big for the arrangement. That's okay. We'll just put it back with the supplies and find a use for it later.

I think part of the problem with that bow was that the ribbon was too wide. Fortunately there is never a shortage of ribbon in my craft zone. I found this printed sheer gold and new it would be perfect.
a brand-new bow and we had a new Christmas decoration.

I can almost hear my mother-in-law say, "that's beautiful."

Oh, I should add this arrangement is attached to an old wood crate that's tipped up on its side. I love to decorate my house with odds and ends such as this crate.  It's absolutely perfect as a lamp stand tucked into a corner next to a chair.

Tuesday, December 17, 2013

Quick Crafts - or so I thought - Christmas Ornament Place Card Holders

Honest, I thought this would be a quick craft. How hard could this be? They're practically done already. At the end of Christmas last year, I picked up these cute little glass ornament place card holders. I knew they'd be a perfect little gift at the next Advent Tea up at the church.


The packaging they came in suggested taking the tops off and squirting paint into the inside to give them a nice glossy color. I picked red because in my stash of excess craft supplies I have a big tube of red acrylic paint. Now I'm not quite sure how old the paint is but I can't tell you it's rather thick. Thick paint did not work so well for this quick craft. I tried changing the position of the bulbs in hopes that gravity would spread the paint around but that took FOREVER!

In the end, I finally grabbed a toothpick, shoved it in there, and swirled that paint around.  The packaging said that I should allow 72 hours for the paint inside to dry. Unfortunately I don't have 72 hours. The Advent Tea was in 5 hours.


After discovering that I'm not a fan of trying to spread thick paint inside of teeny tiny glass bulbs, I came up with a different plan.
I looked through my stash of stuff and found these cute skeins of chenille. There's no wire in these and they remind me of mini Christmas tree garland. Likely I picked these up at a garage sale somewhere knowing I would be able to use them for something. My plan? Simply stuff the chenille in the bulbs.
Okay, here's where a complicated math problem comes into play. Yes, I was one of those geeky students in the class who loved math word problems. "I have six glass bulbs and four skeins of chenille." I also have a bad case of OCD when it comes to using only part of something. I ended up using three of the skeins and tossed the remaining one back in to my trim bin. after cutting each skein into two equal lengths, I had six strings of chenille. One for each of my glass bulbs.
Now it was just a matter of stuffing the chenille into the bulb. (Pardon the red paint on my fingers.) My metal poker tool was perfect to get all of the chenille stuffed in there.
The chenille strand tends to get crowded at the opening as the bulb starts to fill up. Using my tool, I swooshed the chenille around a little bit to even it out and make it look prettier in the bulb.
There, isn't that pretty?

Here's a do as I say, not as I did. Be careful with sharp objects inside of a glass bulb. Glass does tend to break when you smack it hard with a sharp object. 
New dilemma... I now have only five glass bulbs and a scrap length of chenille. Feel free to make fun of me all you'd like, but this really does bother me as now I have scraps.

Here's what the bulbs look like after paint and filling. Now it's time to decorate the top.
Since I had scrapped chenille I decided to wrap it around the top of the painted bulbs. No glue is necessary as the metal prongs on the top of the bulb will hold the chenille in place since the chenille is actually a bunch of tiny loops. If you pull up slightly on the top, you can catch some of those loops in the metal prong.
Remember that bit about paint needing 72 hours to dry? I do believe that's true. I also believe I found another step in this project where being gentle is necessary. Do you know what happens when you give the top of the bulb a firm tug when attempting to secure the chenille? The top pops off and red paint gets on the chenille. OOoops.


I decided to add a simple red ribbon bow to the silver bulbs. They look rather elegant lined up and I'm certain they'd be a lovely addition to a formal holiday place setting. Me personally, I'm not big on all that formality.  I'd rather use them to accent an entry table.  Or slip old Christmas photographs from days gone by into each one and arrange them on a shelf.

They were a hit at the Advent Tea and five of the ladies were able to take home a pair.  I don't know where the odd red one ended up.  Poor thing.


Sunday, November 24, 2013

Quick Crafts - Last Minute Corsage

Boys!  They just don't get it.  According to Facebook, my son is now, "In a Relationship." The rules have changed except he doesn't know it.  A swing dance was scheduled up at the high school and he wanted to take the girl.  I let him know that he'd need a corsage and even offered to make him one.  He did not know, nor did he ever find out for me, the color of her dress.  He did however pick out the red roses so that is what I went with.
So in my stash of craft crap as my husband tends to call it, I gathered up the necessary supplies.
  • Corsage wrist base (craft stick and elastic)
  • One base flower (cream colored mum)
  • Five small roses
  • Three sprigs of smaller cream flower
  • Leaves
  • Ribbon
  • Sting of beads
  • Floral foam
  • Floral wire
  • Floral tape
  • Tacky glue
  • Needle and thread


Step one is to staple of length of elastic to the craft stick unless you have an actual corsage base.


Next, wrap the stick with the floral wire to cover up the staple and hide the wood.


Sandwich the craft stick between sets of leaves and stitch.

Next, using the floral wire, attached a bit of floral Styrofoam to the base and begin to insert the roses.

If it's possible, feed wire through the bigger flower to secure it to the base.  It would not be good to loose the main flower in the middle of the dance.

Once the five roses and the main flower is in place, create five loops of beads.  You could use baby's breath if you have it.  I did not.


Coat the wire in tacky glue before inserting it into the foam.


It's looking good.


Next, add the three sprigs of smaller flowers.  Tacky glue on these stems as well would be good.


And the final step is to add ribbon.  An easy way to do this is to cut a length of ribbon that will allow three loops to be knotted into the ribbon.  Leave about 8 inches loose and wrap the ribbon around the base weaving it in between the flowers.
Secure the ribbon on the corsage with a knot and that's it.
Let the ends of the ribbon hang loose.  I tied another length of ribbon around it all so I would have four strands of ribbon hanging down on the one side of the corsage.


And the corsage is finished.


The rest of the story goes like this....

Boy tells girl about the flowers he picked out for a corsage.
Girl gets excited that she will be getting a corsage for the dance.
Boy forgets corsage at home.
Boy has a lot to learn.

Sunday, November 17, 2013

Where it all started

I can fondly remember sitting in the shopping cart as a small child watching in awe as the Kmart Fabric Associate cut yardage for my mother.  Yes, Kmart used to sell fabric.  Oh how I can still hear that bolt of fabric hitting the counter as she unrolled yard after yard of fabric. Thump, thump, thump... So much potential in that puddle of cloth on the counter.  Her fingers would scrape against the Formica surface as she measured and then folded what would become matching Easter dresses for my sister and me.  Right then and there I KNEW I would someday sell fabric at Kmart.

I was three, what do you want?  It seemed like the perfect job.

My love for Singer sewing machines came a little later.  Kmart ceased to sell fabric so I applied at JoAnn fabrics as a summer job in high school.  And yes, that three-year-old was right, it was the perfect job for me.  Now some will argue that taking a job in a fabric store might not be the best idea for a Fabric Junkie.  And what is also not a good idea is being employed by a company that will allow you to cash your paycheck at their store so you can purchase more FABRIC!

JoAnn's sold Singer sewing machines. While I was employed by them during my college years, they set aside a large area of the store just to showcase those machines.  They were so pretty.  And there was so many of them.  And they could do so many wonderful things.  My favorite part of the job then?  Selling Singer sewing machines.  It was part of my JOB to sit there and sew.  I needed to be able to WOW the customers with what this machine could do.  It was perfect, even if I was still making $3.35 an hour, cashing my checks at the store, and coming home with fabric.  I did make commission from every sale which meant... yes... more fabric at the end of the day.

Thus began my addiction to fabric and my love of Singer sewing machines. At present count, there are 8 Singers sitting here.  Two of the 8 Singers don't really count because they belong to my mother. They were dropped off to be repaired and now I think they're just hiding. Of the machines that actually belong to me, two are treadle machines. One was purchased just before I was married because I told my fiance that I've always wanted one and the other belonged one of my mother's friend.  It needed a home.  Two machines are matching crank style machines.  They're great as long as you can get a teenager to turn the crank for you.  One machine sitting here was from a treadle at one time.  Someone wanted to make a table out of the treadle part and discarded the machine. My mother brought that one over because it was left over from her church rummage sale and...yeah, it needed a home.  I'm looking for a motor for that one.  The final Singer is from 1986 and was a gift from my boyfriend at the time.  Turns out, he used my JoAnn fabric store discount and bought the exact machine that I favored and sold the most.
Yup, that boy was a keeper.  Although, one of these days, I'm really afraid I'll come home to find that he's gathered my girlfriends for an intervention. He loves me, that's for sure, but he does tend to struggle to understand why I have so many sewing machines.